Dating Patterns
Dating patterns can be tricky. Some have a date of printing while others have a patent number or date and yet more no date at all. In many cases dating is down to cross-referencing other material including actual garments and published images to come up with a possible outline.
Example Pattern
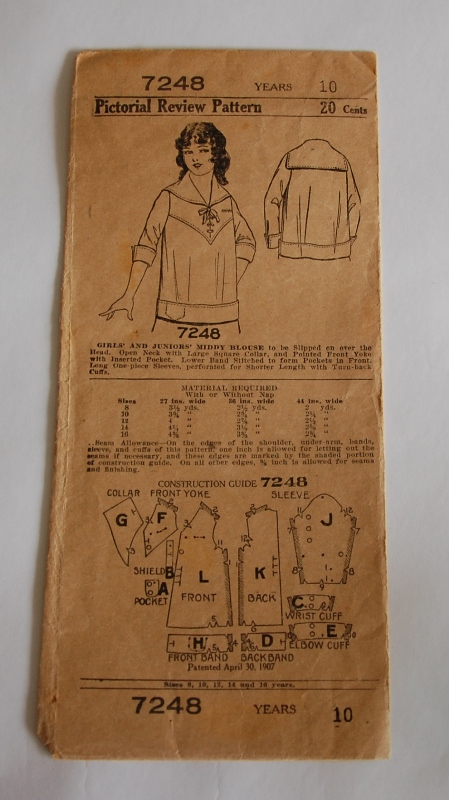
Pictorial Review Pattern 7246, Girls’ and Junior Miss Middy Blouse, AGE 10, Patented April 30th 1907, but probable date 1917-18
The sample pattern used here gives the following:‘ Patented April 30th 1907’, however it is in a style popular during the Great War.

In fact, the Patent date does not refer to the date of the design of the garment, but to the date of the patent granted covering the invention, in this case, of ‘patterns, usually of paper, though other material may be used, employed in connection with the cutting fabrics preliminary to the making of dresses or other garments, and it consists of certain improvements in keying the means for identifying the several sections of such patterns whereby the use of the same is greatly facilitated’ For the complete patent follow this link.
Pattern Envelope information
Early dress-making patterns were usually supplied in an envelope with a detailed line drawing of the finished garment, often showing front and back views. They usually have a cutting layout and this can sometimes be the only guide as to what the pattern pieces are. There should also be recommended yardage and basic instructions for making up.
Fabric widths
The widths of fabric available in the 1910s varied from now and include a narrow width of 27inches as well as the more standard 36inches and 44inches.
Sizing standards
Patterns were usually packaged as one size with the size stamped on the envelope. However, it is always best to refer to the measurements (if given) as sizing standards and fashionable body shapes have altered.
Pattern Format
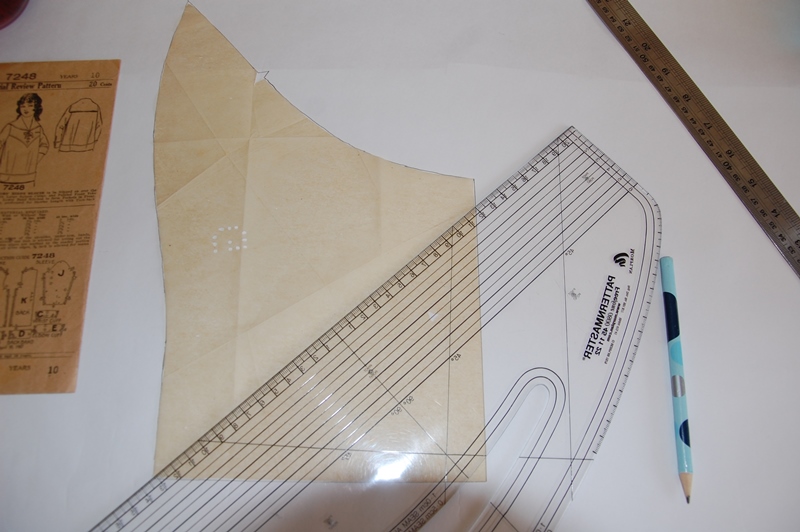
These early dress-making patterns were made from pre-cut, delicate tissue paper. They were not printed on, but had the construction details applied as a series of punch-holes and notches. Unfortunately, there isn’t a standard key across the different makes, but the pattern envelope should explain the key used.
On this pattern the symbols are explained as follows:
- Notches (V) show how the pattern is to be put together.
- Large (O) perforations show how to lay the pattern on the straight grain of the fabric.
- One (T) [a sort of T created by three small notches, more like a small clover leaf] and one (O) for adjusting of plaits [narrow pleats].
- Two (T T) show where the pattern is to be gathered
- Three (T T T) or one (T) show where there is no seam and to place on the fold of the material.
- In addition, each pattern piece is punched with a letter to identify it.
Layout

Half patterns (i.e. half a belt or collar) are often supplied and this is indicated on the pattern layout. However, sometimes number of pieces of fabric that should be cut from any given pattern piece is less than required – perhaps it is assumed that another fabric will be used to back it. For example, a layout which shows two-piece cuffs cut once where four pieces are required.
Seam allowance
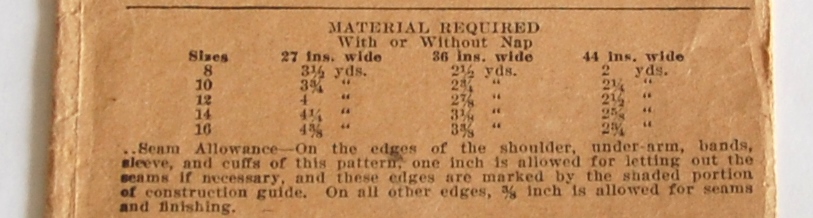
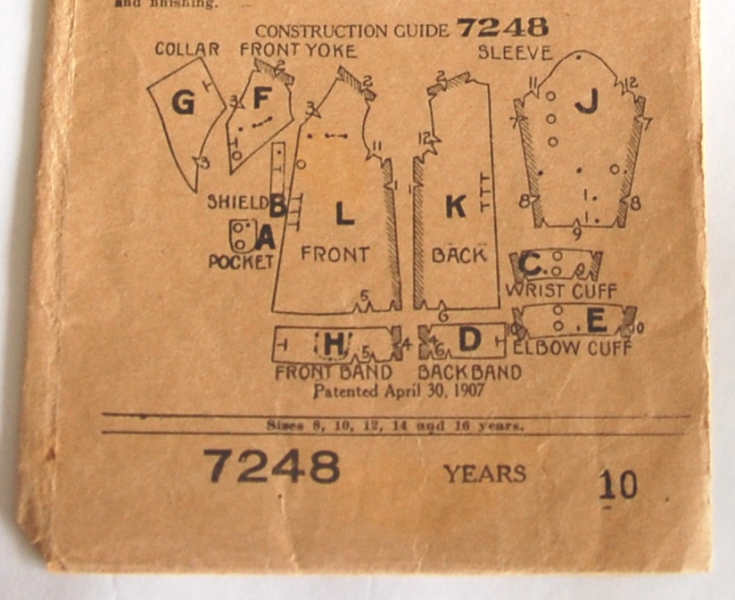 Later patterns usually give a standard 5/8th of an inch seam allowance, but on the early patterns this varies considerably and some patterns give no allowance at all. On this pattern for a child’s top, the seam allowances are given as 3/8ths on all seams except the shoulder, under-arm, bands, seam and cuff where an allowance of 1 inch is given ‘for letting out the seams if necessary’. The wider seam allowances are also indicated on the pattern by shading (left).
Using the pattern
Always make a copy!
Never use the actual pattern but make a copy of it. Iron all the pattern pieces smooth using a cool, dry iron, gently teasing out the folds and taking care to ease out the corners etc. so that the detail of the shape is not lost. Trace around each piece with a pencil, carefully copying all notches and perforations (do not use a pen as this may mark the original).
Cross reference with the pattern envelope and make notes on each piece including: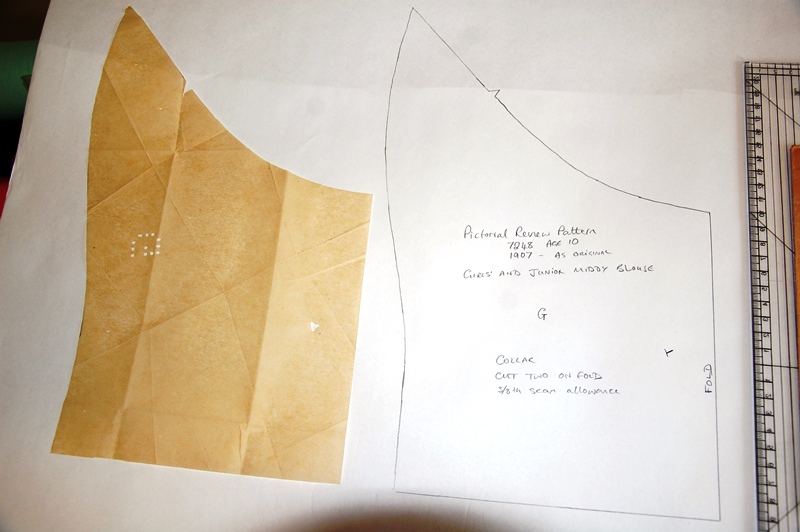
- Pattern make, serial number and date of pattern
- Pattern size
- Pattern piece – both the number/letter code and type (i.e. cuff)
- Translate the key, for example three (TTT) = place on fold.
- Note the number of pieces of fabric to be cut from each pattern piece
- Give Seam allowance
- Join the large (O) perforations with a line to indicate the straight grain of the fabric.
- Carefully refold the original patterns pieces and store with the envelope.
Bonus
Going through this process has the added advantage of enabling you to get to know and understand the pattern before you start, which will reduce the time you spend puzzling over it later!
End result:
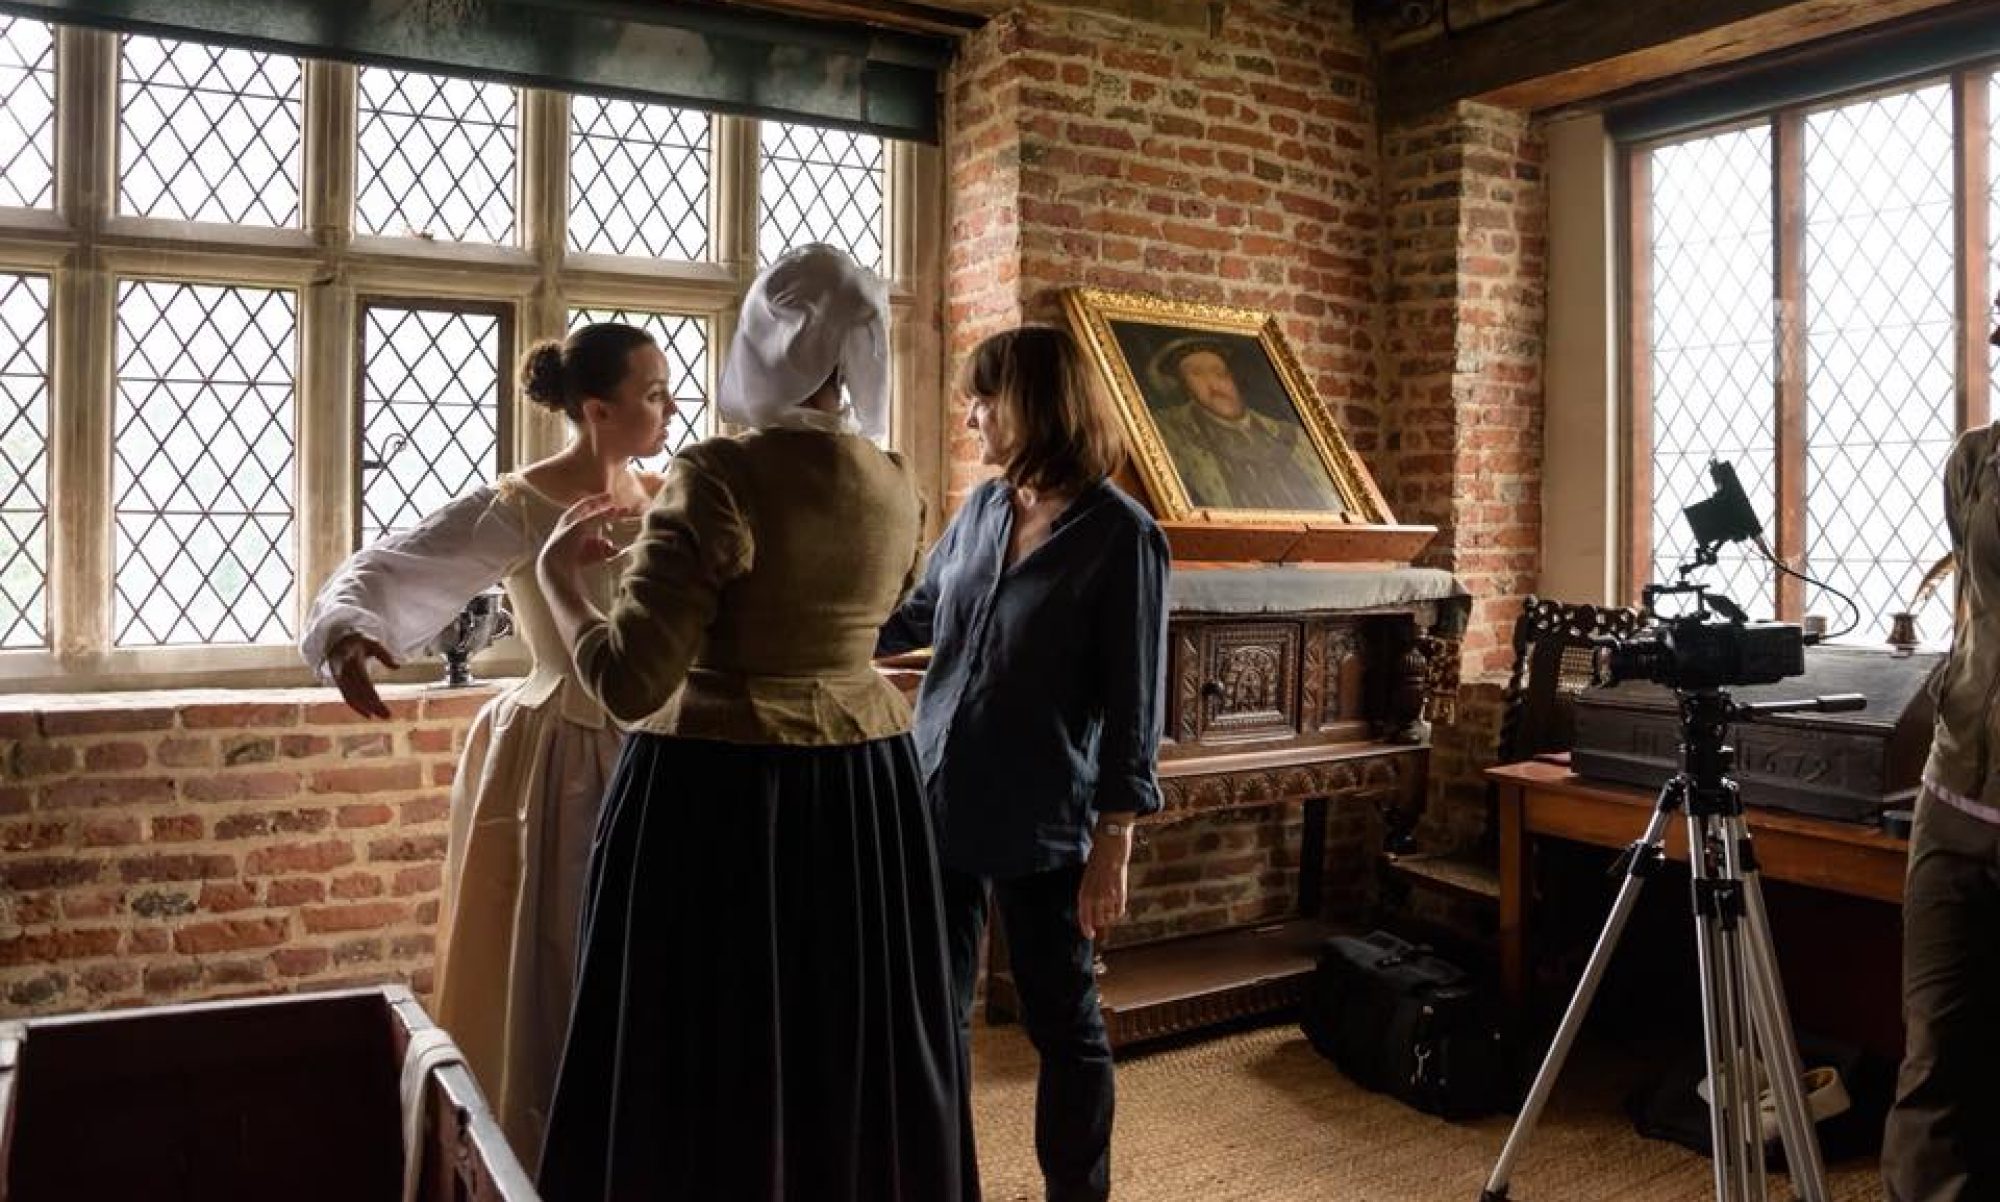
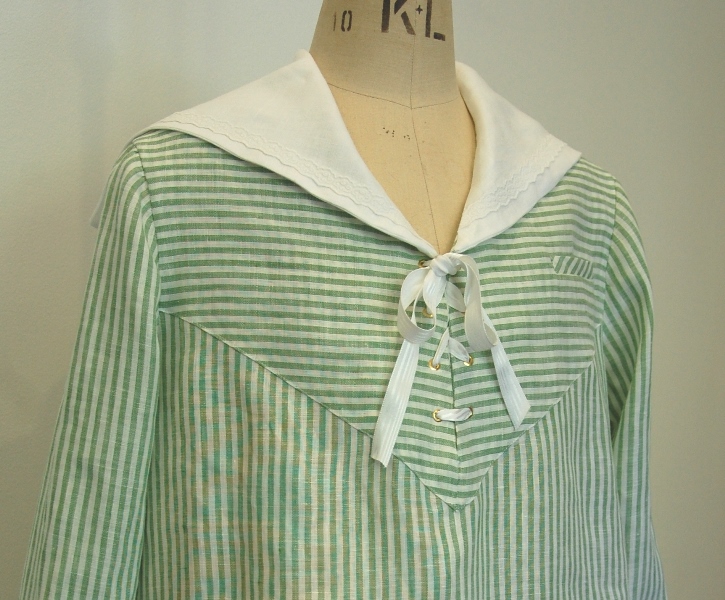
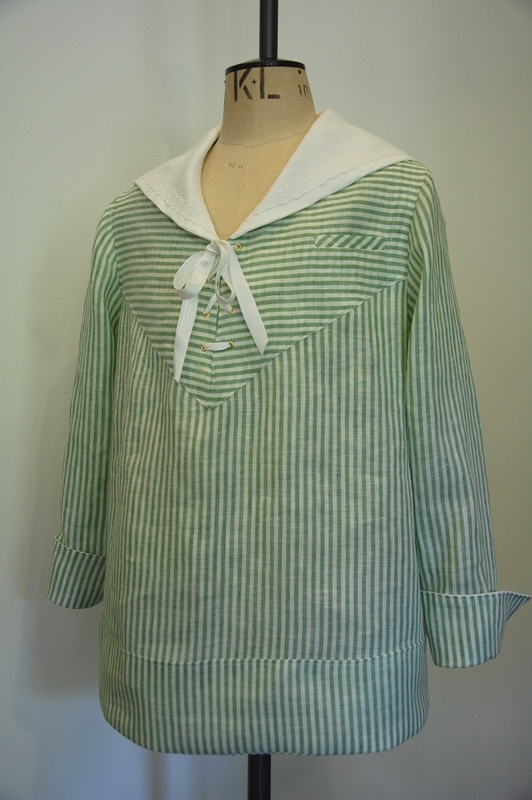 A girl’s middy blouse from a woven striped linen with white linen collar for contrast. Vintage trim was used on the collar and white silk ribbon used to lace up the front. The pattern copying and making up took about a day and a half and the middy blouse will be used in a film we are making about the First World War ‘Tell Them of Us’.
Tip
Don’t be afraid of making mistakes – mistakes mean that you have left you comfort zone and you are on a learning curve, congratulations!
